Working With ListBox using ASP.NET and Csharp
In this article I will cover some more useful features of ListBox. These features are not directly available with ListBox but you can achieve this writing some lines of code.
download
Introduction:
After demonstrating the various functionalities of ListBox in my previous articles, let’s discuss some more features. This article will cover the Multiple Selection, Sorting and Searching etc.
This article will cover the following topics:
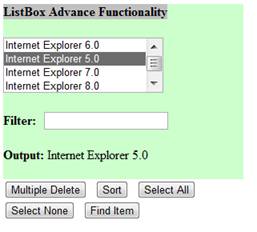
Figure 1: Initial UI of ListBox Advance functionality
Add Labels and TextBox for input and output.
ASP.NET buttons are used here to perform ListBox functions on the page.
Listing 1: ASP.NET Script for ListBox
Listing 2: Namespaces Required
Let’s write the code for page load event, Here we fill some data into ListBox. All this data is coming from XML. The separate XML code is written to fetch XML data. Please refer to source code.
Listing 3: Page Load Event
In below code you can see two methods “btnSelectAll_Click” is an event; this event will fire when you press the button “Select All”. And this event will call internally “SetSelection(true)”, which will select all the items. Note that this method will do select all and select none both. Just change argument of this method from true to false and will start behaving opposite.

Figure 2: ListBox - All Items are Selected
Listing 4: C# code to Select All Items
Listing 5: C# Code to Perform Select None
So to do the multiple delete, you have to first do the multiple selection, as you know that we already enabled(ASP.NET property) multiple selection functionality in ListBox. So do the multiple selections by holding the CTRL key and clicking the ListBox items.
Now let’s write the delete code for this selection. You have to loop through each item of ListBox and if item is selected just perform delete operation by using remove method. Note that after deleting reduce the for loop counter by 1 otherwise it will through an exception.
Listing 6: C# Code for Mutiple Delete
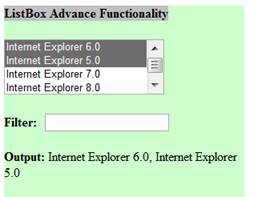
Figure 3: Multiple Delete
Now use the below LINQ expression to sort the values. Here you can specify the sorting by value or text. Like below code is having “orderby dic.Value”, it means sort the items by value.
Now after getting the sorted dictionary, add this to ListBox again.
Listing 7: C# Code for Sorting ListBox Items
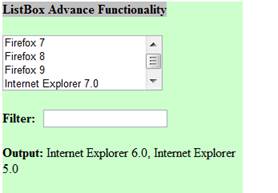
Figure 4: Sorted Items
Listing 8: C# Code to Find an Item in ListBox
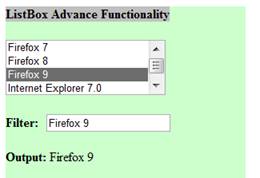
Figure 5: Find Item - Firefox 9 found
Let’s discuss one more code snippet, This code will get execute on every item selection change, and display the current selected items in label.
Listing 9: C# Code to perform SelectedIndexChange Event
Please comment here if have any questions regarding above article.
This article will cover the following topics:
- ASP.NET - Script
- ListBox - Select All
- ListBox - Select None
- ListBox - Multiple Delete
- ListBox - Sort
- ListBox - Find Item
Figure 1: Initial UI of ListBox Advance functionality
ASP.NET Script:
Let’s start with ASP.NET Script, Add a simple ASP.NET ListBox and enable multi-selection for this ListBox by SelectionMode="Multiple". Also we have to perform some operation on selection, so make AutoPostBack="True"Add Labels and TextBox for input and output.
ASP.NET buttons are used here to perform ListBox functions on the page.
Listing 1: ASP.NET Script for ListBox
<head runat="server">
    <title>MrBool.com Tutorials - Advance ListBox</title>
</head>
<body >
    <form id="form1" runat="server">
    <div style="background-color:#CCFFCC; width:300px" >
        <b style="background-color:Silver;" >ListBox Advance Functionality</b>
        <br />
        <br />
        <asp:ListBox ID="lstBrowser" runat="server" Width="200px"
            SelectionMode="Multiple" AutoPostBack="True"
            onselectedindexchanged="lstBrowser_SelectedIndexChanged"></asp:ListBox>
        <br />
        <br />
        <asp:Label ID="lblFilter" runat="server" Font-Bold="True" Text="Filter: "></asp:Label>
 <asp:TextBox ID="txtFilter" runat="server"></asp:TextBox>
        <br />
        <br />
        <asp:Label ID="lbl" runat="server" Font-Bold="True" Text="Output:"></asp:Label>
        <asp:Label ID="lblOutput" runat="server"></asp:Label>
        <br />
        <br />
    </div>
    <asp:Button ID="btnDelete" runat="server" OnClick="btnDelete_Click"
        Text="Multiple Delete" />
     <asp:Button ID="btnSort" runat="server" OnClick="btnSort_Click"
        Text="Sort" />
     <asp:Button ID="btnSelectAll" runat="server" OnClick="btnSelectAll_Click"
        Text="Select All" />
        <br />
    <asp:Button ID="btnSelectNone" runat="server"
        OnClick="btnSelectNone_Click" Text="Select None" />
     <asp:Button ID="btnFindIem" runat="server"
        OnClick="btnFindIem_Click" Text="Find Item" />
     </form>
</body>
C# Code:
All the logic for ListBox operations are written in C#, so will go through each functionality one by one. We have to perform certain operations which require including some namespace. So add the following namespaces in your C# code before proceeding further.Listing 2: Namespaces Required
using System;
using System.Data;
using System.Web.UI.WebControls;
using System.Collections;
using System.Collections.Generic;
using System.Linq;
Listing 3: Page Load Event
protected void Page_Load(object sender, EventArgs e)
    {
        if (!IsPostBack)
        {
            DataSet oDs = ReadDataSet();
            lstBrowser.DataTextField = "Name";
            lstBrowser.DataValueField = "ID";
            lstBrowser.DataSource = oDs;
            lstBrowser.DataBind();
        }
    }
ListBox - Select All:
Let’s discuss the selecting all items in ListBox. For that you have to loop through all items of ListBox and make selected property true.In below code you can see two methods “btnSelectAll_Click” is an event; this event will fire when you press the button “Select All”. And this event will call internally “SetSelection(true)”, which will select all the items. Note that this method will do select all and select none both. Just change argument of this method from true to false and will start behaving opposite.
Figure 2: ListBox - All Items are Selected
Listing 4: C# code to Select All Items
protected void btnSelectAll_Click(object sender, EventArgs e)
    {
        SetSelection(true);
    }

private void SetSelection(bool blnFlag)
    {
        foreach (ListItem lstItem in lstBrowser.Items)
        {
            lstItem.Selected = blnFlag;
        }
    }
ListBox - Select None:
Select None functionality is just opposite to “Select All”. As we discuss earlier, we can reuse the “SetSelection” method and pass false as an argument.Listing 5: C# Code to Perform Select None
protected void btnSelectNone_Click(object sender, EventArgs e)
    {
        SetSelection(false);
    }

private void SetSelection(bool blnFlag)
    {
        foreach (ListItem lstItem in lstBrowser.Items)
        {
            lstItem.Selected = blnFlag;
        }
    }
ListBox - Multiple Delete:
Let’s discuss that how to implement multiple delete in ListBox.So to do the multiple delete, you have to first do the multiple selection, as you know that we already enabled(ASP.NET property) multiple selection functionality in ListBox. So do the multiple selections by holding the CTRL key and clicking the ListBox items.
Now let’s write the delete code for this selection. You have to loop through each item of ListBox and if item is selected just perform delete operation by using remove method. Note that after deleting reduce the for loop counter by 1 otherwise it will through an exception.
Listing 6: C# Code for Mutiple Delete
protected void btnDelete_Click(object sender, EventArgs e)
    {
        if (lstBrowser.Items.Count > 0 && lstBrowser.SelectedIndex >= 0)
        {
            for (int i = 0; i < lstBrowser.Items.Count; i++)
            {
                if (lstBrowser.Items[i].Selected)
                {
                    lstBrowser.Items.Remove(lstBrowser.Items[i]);
                    i--;
                }
            }

            if (lstBrowser.Items.Count > 0)
            lstBrowser.SelectedIndex = 0;
        }

    }
Figure 3: Multiple Delete
ListBox - Sort:
Let’s discuss the sort operation. You cannot perform the sort operation directly on ListBox. You have to first create the dictionary and fill the ListBox text and value items in it.Now use the below LINQ expression to sort the values. Here you can specify the sorting by value or text. Like below code is having “orderby dic.Value”, it means sort the items by value.
Now after getting the sorted dictionary, add this to ListBox again.
Listing 7: C# Code for Sorting ListBox Items
  protected void btnSort_Click(object sender, EventArgs e)
    {
        Dictionary<string, string> slBrowser = new Dictionary<string, string>();
        foreach (ListItem lstItem in lstBrowser.Items)
        {
            slBrowser.Add(lstItem.Value, lstItem.Text);
        }

        var sortedDic = (from dic in slBrowser orderby dic.Value ascending select dic);

        lstBrowser.DataTextField = "Value";
        lstBrowser.DataValueField = "Key";
        lstBrowser.DataSource = sortedDic;
        lstBrowser.DataBind();

    }
Figure 4: Sorted Items
ListBox - Find Item:
To find an item in ListBox, it provide an method “FindByText”, just use this method and pass the text in it and it will return matching item. There is another method “FindByValue”, which search the item by Value.Listing 8: C# Code to Find an Item in ListBox
protected void btnFindIem_Click(object sender, EventArgs e)
    {
       ListItem lstItem = lstBrowser.Items.FindByText(txtFilter.Text);
       if (lstItem != null)
           lblOutput.Text = lstItem.Text;
       else
           lblOutput.Text = "No Match Found.";
    }
Figure 5: Find Item - Firefox 9 found
Let’s discuss one more code snippet, This code will get execute on every item selection change, and display the current selected items in label.
Listing 9: C# Code to perform SelectedIndexChange Event
protected void lstBrowser_SelectedIndexChanged(object sender, EventArgs e)
    {
        lblOutput.Text = "";
       if (lstBrowser.Items.Count > 0 && lstBrowser.SelectedIndex >= 0)
        {
            for (int i = 0; i < lstBrowser.Items.Count; i++)
            {
                if (lstBrowser.Items[i].Selected)
                {
                    lblOutput.Text += ", " + lstBrowser.Items[i].Text;
                }
            }
            lblOutput.Text = lblOutput.Text.TrimStart(',');
            }
    }
Conclusion:
We have covered some functionalities which is not directly provided by ListBox, These functionalities are very useful and generally required while dealing with List controls.Please comment here if have any questions regarding above article.


nic post
ReplyDeletehttp://mkniit.blogspot.in