| Pattern | What & When |
| Decorator |
|
| ****************** Proxy |
|
| ****************** Bridge |
|
Saturday, 26 July 2014
What and When Design Pattern?
Friday, 5 April 2013
Insert Update Delete in Entity Freamwork
What is Entity Framework?
First question that comes to the mind is what is an entity framework?
So let’s see standard definition of Entity Framework given by Microsoft:
The Microsoft ADO.NET Entity Framework is an Object/Relational Mapping (ORM) framework that enables developers to work with relational data as domain-specific objects, eliminating the need for most of the data access plumbing code that developers usually need to write. Using the Entity Framework, developers issue queries using LINQ, then retrieve and manipulate data as strongly typed objects.
Now the question is what is O/RM framework and why do we need it?
ORM is a tool for storing data from domain objects to relational database like MS SQL Server in an automated way without much programming. O/RM includes three main parts: Domain class objects, Relational database objects and Mapping information on how domain objects maps to relational database objects (tables, views & storedprocedures). ORM helps us to keep our database design separate from our domain class design. This makes application maintainable and extendable. It also automates standard CRUD operation (Create, Read, Update & Delete) so developer doesn’t need to write it manually.
There are many ORM frameworks for .net in the market like DataObjects.Net, NHibernate, OpenAccess, SubSonic etc. ADO.NET Entity Framework is from Microsoft.


3) It opens Entity Data Model Wizard. Select ‘Generate from database’ option and click ‘Next’

Entity Framework vs LINQ-to-SQL:
You may think that what is the difference between Entity Framework and LINQ to SQL which does that same thing. There are some differences between Entity Framework and L2S.
- Entity framework has a full provider model. It supports not only SQL Server but also other database like Oracle, DB2, MySQL etc.
- Most of the time L2S classes must be one-to-one with database objects e.g. Customer class can be mapped only with Customer table. Where as in Entity Framework you can map your domain class with multiple tables using various inheritance strategies like table per type (class) or table per hierarchy of classes etc.
- You can have multiple modeling techniques using Entity Framework 4.1 like code first, model first or database first.
- Microsoft has long term strategy to support and integrate Entity Framework with multiple Microsoft products.
Setting up the environment:
Setting up the database
This tutorial will use sample SchoolDB which has different tables, stored procedures and view.
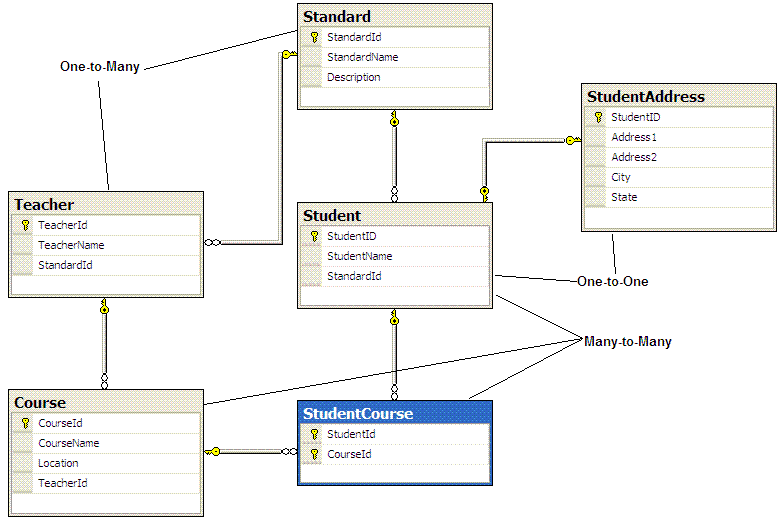
Following is SchoolDB database design:

We have taken all kind of relationship between the database tables for demo purpose, for example:
- One-to-One: Student and StudentAddress has one-to-one relationship eg. Student has zero or one StudentAddress.
- One-to-Many: Standard and Teacher has one-to-many relationship eg. many Teachers can be associate with one Standard.
- Many-to-Many: Student and Course has many-tomany relationship using StudentCourse table where StudentCourse table includes StudentId and CourseId. So one student can join many courses and one course also can have many students.
The SchoolDBScript.zip file contains a .sql script that you need to run against your SQL Express or SQL Server 2005 database. This script will generate the database for a school, and the tables and stored procedures required.
SchoolDBScript.zip
Create the First simple Entity Data Model (EDM):
Let’s create first simple ADO.Net entity data model for SchoolDB database created in previous step and understand basic building blocks. Let’s do it step by step.
We will use VS2010 and Entity Framework 4.1 throughout this tutorial.
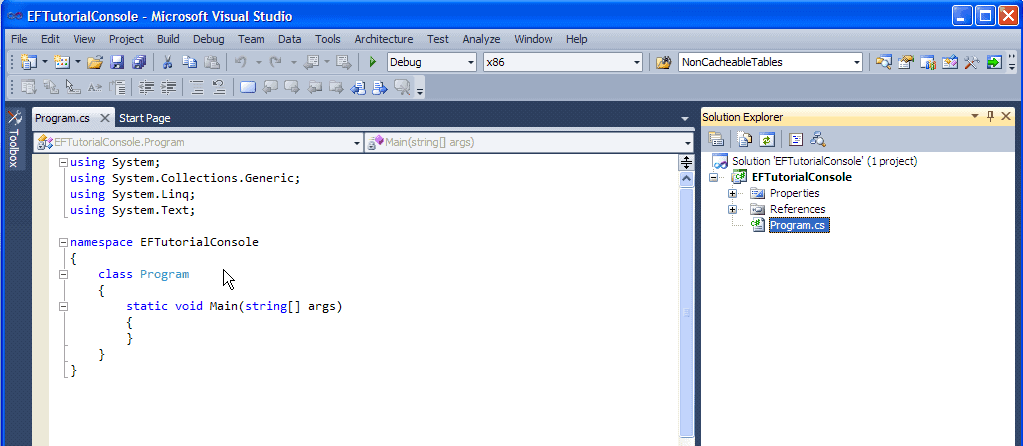
1) Open VS2010 and create console project.

2) Right click on ‘EFTutorialProject’ and go to Add -> New Item and select ADO.NET Entity Data Model from the popup and click "Add".

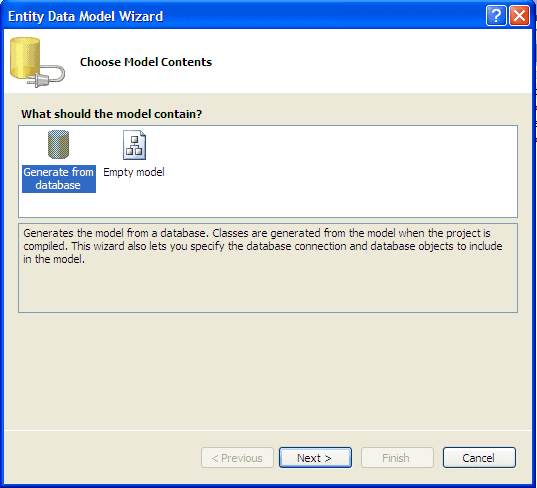
3) It opens Entity Data Model Wizard. Select ‘Generate from database’ option and click ‘Next’

4) You can choose the data connection from your existing DB Connections or create new connection by clicking ‘New Connection’ button. I used existing db connection to my schoolDB Database. If you select the checkbox 'Save entity connection settings in App.Config as:' This will also add connection string to your app.config file with default suffix with db name. You can change it if you want. Click ‘Next’ after you set up your db connection.

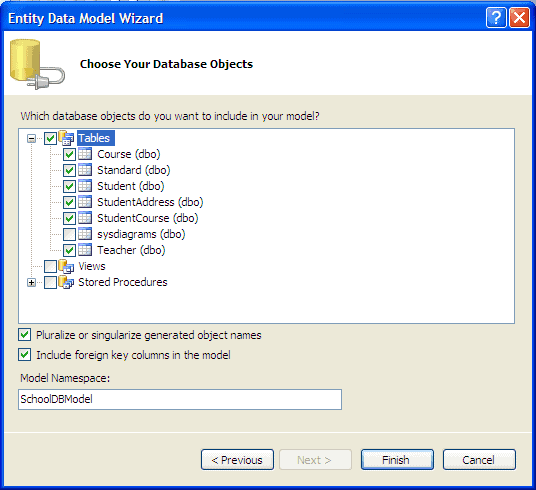
5) This step will display all the Tables, Views and Stored Procedures in the database. Select tables, views and SPs you want and click ‘Finish.

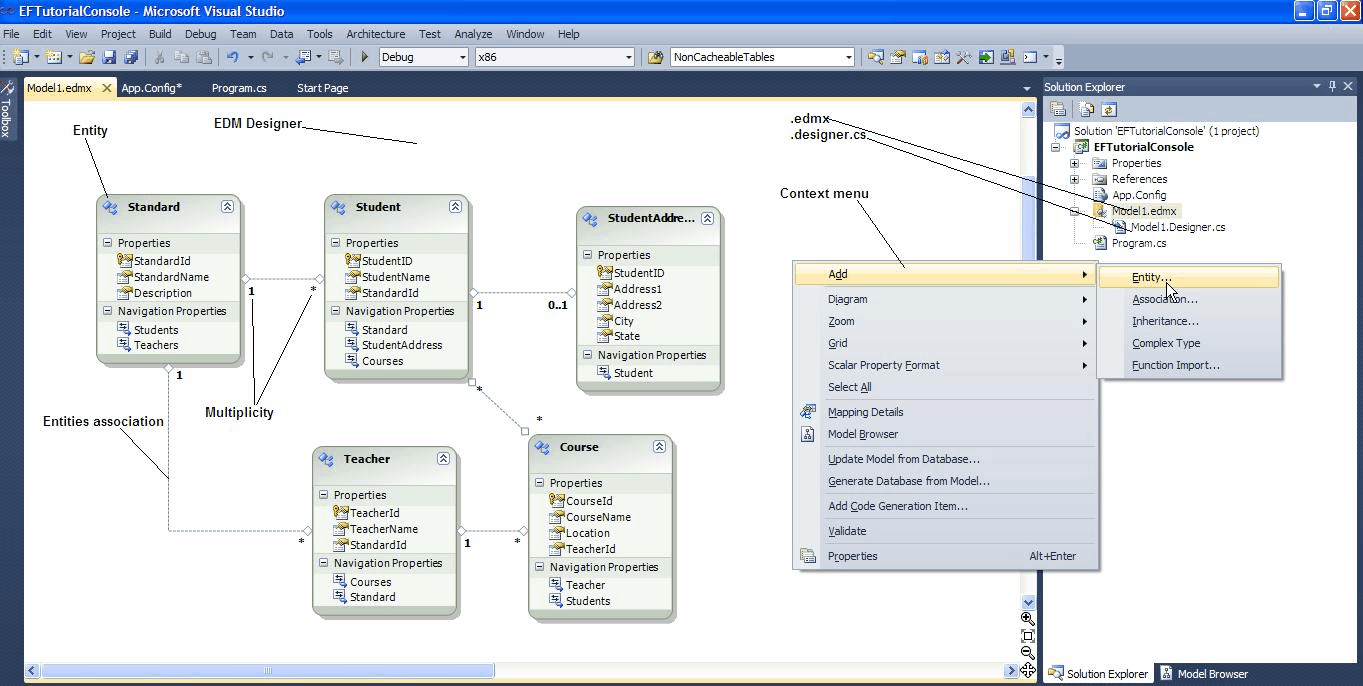
6) After clicking on ‘Finish’, it will add Model1.edmx file into your project.

By double clicking on Model1.edmx, it will open EDM designer which displays all the entities for selected tables and relation between them.
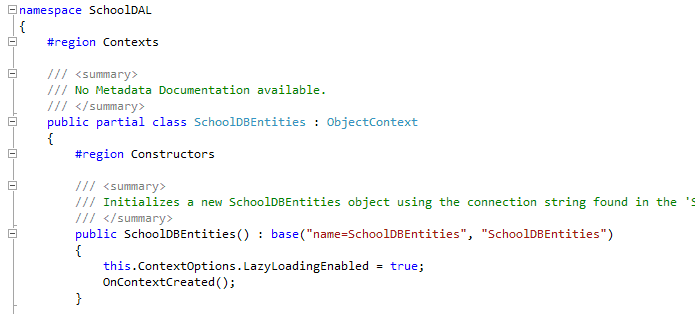
ObjectContext:Now, if you open Model1.designer.cs, you can see two main regions, Contexts and Entities. Expand contexts region. You can see partial class with suffix ‘entities’ and derived from ObjectContext class.
This class represents EntityContainer which you can see from XML view of Model1.edmx or from EDM property window. You can call this as context class.
This class is the primary class for interacting with entity objects and database. An instance of the ObjectContext class encapsulates the connection to the database, metadata that describes the model, and an ObjectStateManager object that tracks objects during create, update, and delete operations.

ObjectSet: Each EntitySet in context class is a type of ObjectSet<> that wraps the entity. e.g. ObjectSet.
IObjectSet: IObjectSet is a interface which gives collection like functionality. ObjectSet<> also implements IObjectSet. IObjectSet is useful in unit testing where you can create fake EntitySet (of type IObjectSet<>). We have used IObjectSet in our sample project.
One important point to understand here is that if we use IObjectSet then we will not get some functionality of ObjectSet like Include, Except and other methods. However, we have to write extension methods for Include or Except method, which will have same functionality.
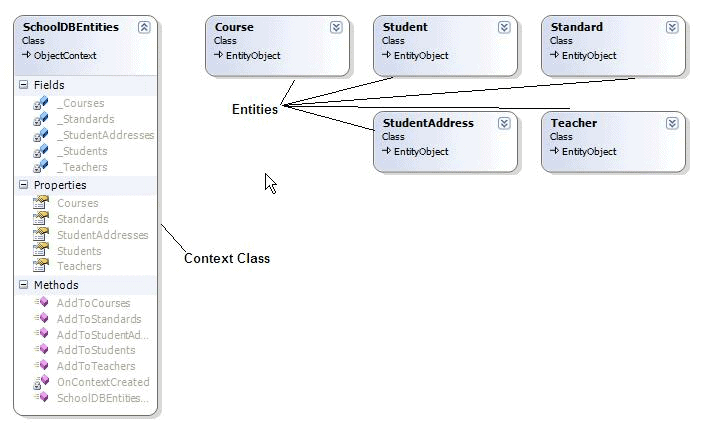
EntityTypes: Now if you expand ‘Entities’ region, you can see many partial classes that are derived from EntityObject. This classes are EntityTypes of you model.
Following diagram shows our EDM classes:

Querying with EDM:
You can query EDM mainly by three ways, 1) LINQ to Entities 2) Entity SQL 3) Native SQL
1) LINQ to Entities: L2E query syntax is easier to learn than Entity SQL. You can use your LINQ skills for querying with EDM. Following code snippet shows how you can query with EDM created in previous step.
First, you have to create object of context class which is SchoolDBEntities. You should initialize it in “using()” so that once it goes out of scope then it will automatically call Dispose() method of context class. Now, you can use LINQ with context object. LINQ query will return IQueryable<> object but underlying type of var will be ObjectQuery. You can then get single object using FirstOrDefault<>() or list of objects by using ToList<>().
2) Entity SQL: Another way to create a query, instead of LINQ to Entities, is by using the Entity Framework’s Object Services directly. You can create an ObjectQuery directly combined with the Entity Framework’s T-SQL-like query language, called Entity SQL, to build the query expression.
Following code snippet shows same query result as L2E query above.
Here also, you have to create object of context class. Now you have to write SQL query as per Entity to SQL syntax and pass it in CreateQuery<>() method of context object. It will return ObjectQuery<> result. You can then single object using FirstOrDefault<>() or list of object by using ToList<>().
3) Native SQL In the Entity Framework v4 new methods ExecuteFunction(), ExecuteStoreQuery() and ExecuteStoreCommand() were added to the class ObjectContext. So you can use these methods to execute Native SQL to the database as following:
One important thing to understand is that there are two new types introduced for Code First approach, DbContext and DbSet. DbContext is a simplified alternative to ObjectContext and is the primary object for interacting with a database using a specific model. DbSet(Of TEntity) is a simplified alternative to ObjectSet(Of TEntity) and is used to perform CRUD operations against a specific type from the model in Code First approach.

 So this is called ‘Model First’ approach.


1) LINQ to Entities: L2E query syntax is easier to learn than Entity SQL. You can use your LINQ skills for querying with EDM. Following code snippet shows how you can query with EDM created in previous step.
2) Entity SQL: Another way to create a query, instead of LINQ to Entities, is by using the Entity Framework’s Object Services directly. You can create an ObjectQuery directly combined with the Entity Framework’s T-SQL-like query language, called Entity SQL, to build the query expression.
Following code snippet shows same query result as L2E query above.
Here also, you have to create object of context class. Now you have to write SQL query as per Entity to SQL syntax and pass it in CreateQuery<>() method of context object. It will return ObjectQuery<> result. You can then single object using FirstOrDefault<>() or list of object by using ToList<>().
3) Native SQL In the Entity Framework v4 new methods ExecuteFunction(), ExecuteStoreQuery() and ExecuteStoreCommand() were added to the class ObjectContext. So you can use these methods to execute Native SQL to the database as following:
 //Querying with native sql
    using (SchoolDBEntities ctx = new SchoolDBEntities())
        {
            //Inserting Student using ExecuteStoreCommand
            int InsertedRows = ctx.ExecuteStoreCommand("Insert into Student(StudentName,StandardId) values('StudentName1',1)");

            //Fetching student using ExecuteStoreQuery
            var student = ctx.ExecuteStoreQuery<Student>("Select * from Student where StudentName = 'StudentName1'", null).ToList();

        }
Code First development with Entity Framework 4.1
Visual Studio 2010 brought new approaches to modeling for Entity Framework 4.1.
- Code First
- Model First
- Database first
Code First: In Code First approach, you avoid working with visual model designer (EDMX) completely. You write your POCO classes first and then create database from these POCO classes. Developers who follow the path of Domain-Driven Design (DDD) principles prefer to begin by coding their classes first and then generating the database required to persist their data.
Model First development with Entity Framework
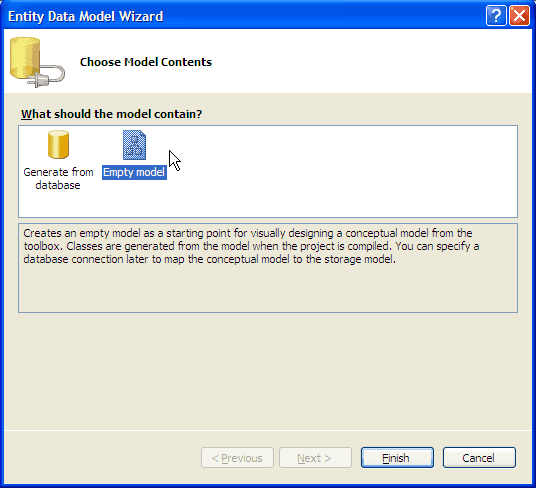
Model First: In Model First approach, you create Entities, relationships, and inheritance hierarchies directly on the design surface of EDMX. So in Model First approach, when you add ADO.NET Entity Data Model, you should select ‘Empty Model’ instead of ‘Generate from database’.
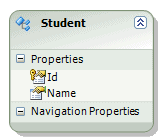
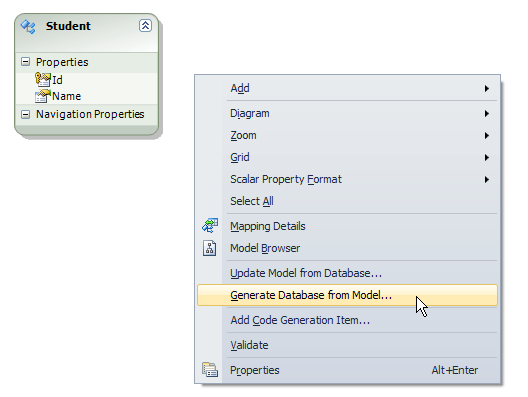
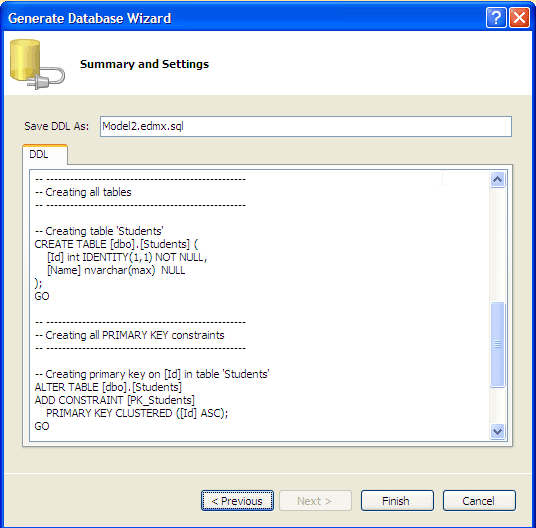
After creating required entities, associations and inheritance on design surface of the empty model, you can use designer’s context menu option ‘Generate database from model’. However don’t get confused with name. it will not generate new database from model. It will only give you DDL to execute in existing database. For example, I have created simple student model with id and name properties as per following figure.

Now I will generate the database from model using context menu.

I will then select existing database connection and then it will display DDL for the student entity and it is up to you to execute this DDL.
Database First development with Entity Framework 4.0
We have seen this approach in our first EDM sample where we created model and classes from existing database. So when you generate EDMX from existing database then it is a Database First approach.Entity Lifecycle:
Before we work on CRUD operation (Create, Read, Update, Delete), it’s important to understand entity lifecycle and how it’s being managed by EntityFramework 4.0.
During entity’s lifetime, each entity has an entity state based on operation performed on it via Context (ObjectContext). The entity state is an enum of type System.Data.EntityState that declares the following values:
- Added
- Deleted
- Modified
- Unchanged
- Detached
The Context not only holds the reference to all the objects retrieved from the database but also it holds the entity states and maintains modifications to the properties of the entity. This feature is known as Change Tracking.
The change in entity state from the Unchanged to the Modified state is the only state that’s automatically handled by the context. All other changes must be made explicitly using proper methods of ObjectContext:
| Sr. | ObjectContext Methods | Description | EntityState |
|---|---|---|---|
| 1 | AddObject | Adds an entity to the context | Added |
| 2 | Attach | Attaches an entity to the context | Unchanged |
| 3 | ApplyCurrentValues | Replace currently attached entity’s scalar value with the property values of detached entity. | Modified |
| 4 | ApplyOriginalValues | It applies original database values to attached entity’s properties. | Unchanged |
| 5 | DeleteObject | Delete the object from context. | Deleted |
| 6 | AcceptAllChanges | pushes the current values of every attached entity into the original values. | Unchanged |
| 7 | ChangeState or ChangeObjectState | Change an entity from one state to another without any restrictions (except for Detached) | Based on passed state |
| 8 | Detach | Removes an entity from the context. | Detached |
Entity Relationships:
You can have three types of relations in EDM as in database. 1) One to One 2) One to Many 3) Many to Many.
Let’s examine database table design before going into relationships in EDM. Following figure is a database diagram of SchoolDB used in this tutorial.

As you can see in the figure, student and StudentAddress have One-to-One relationshionship where each student has zero or one address.
Standard and Teacher has One-to-Many relationship where one standard can have many teachers but one teacher can’t go to many standard (Standard is a classroom).
Student and Course has Many-to-Many relationships by using StudentCourse table. StudentCourse consists primary key of both the tables and thus it makes relation Many-to-Many.
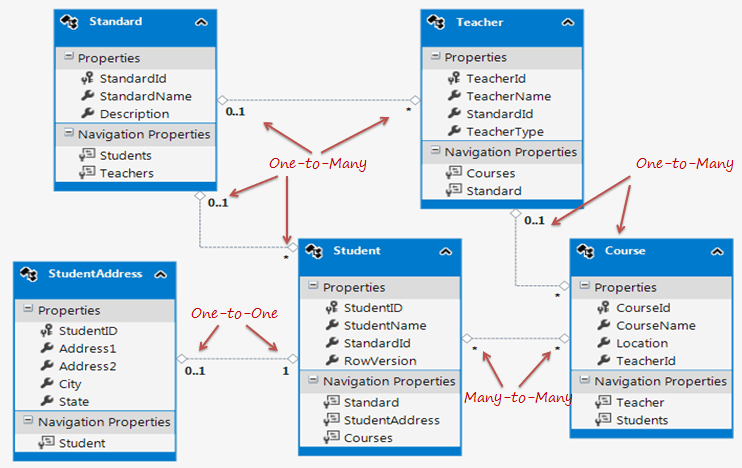
When you create ADO.NET Entity Data Model from this database using ‘Generate from existing database’ option, it will create following entities and relationships into EDM:

As you can see in the above figure, Student and StudentAddress has One to One relationship (zero or one). StudentAddress entity has StudentId property as PK which makes it One-to-One relationship. Standard and teach has One-to-Many relation marked by multiplicity where 1 is for One and * is for Many.
Standard entity has navigation property “Teachers” which indicates that one Standard can have list of teachers and Teacher entity has “Standard” navigation property which indicates that Teacher is associated with one Standard. This makes it One-to-Many relationship.
Student and Course have Many-to-Many relationships marked by * multiplicity, but it doesn’t display entityset for middle table “StudentCourse” where primary key of both tables will be stored. This is because The EDM represents many-to-many relationships by not having entityset for the joining table in CSDL, instead it manages through mapping. It can do this only when the join table has just the relevant keys and no additional fields. If the join tables had additional properties, such as DateCreated, the EDM would have created entities for them and you have to manage Many-to-Many relationship entities manually.
So now let’s see how Many-to-Many relationship is being managed in EDM.
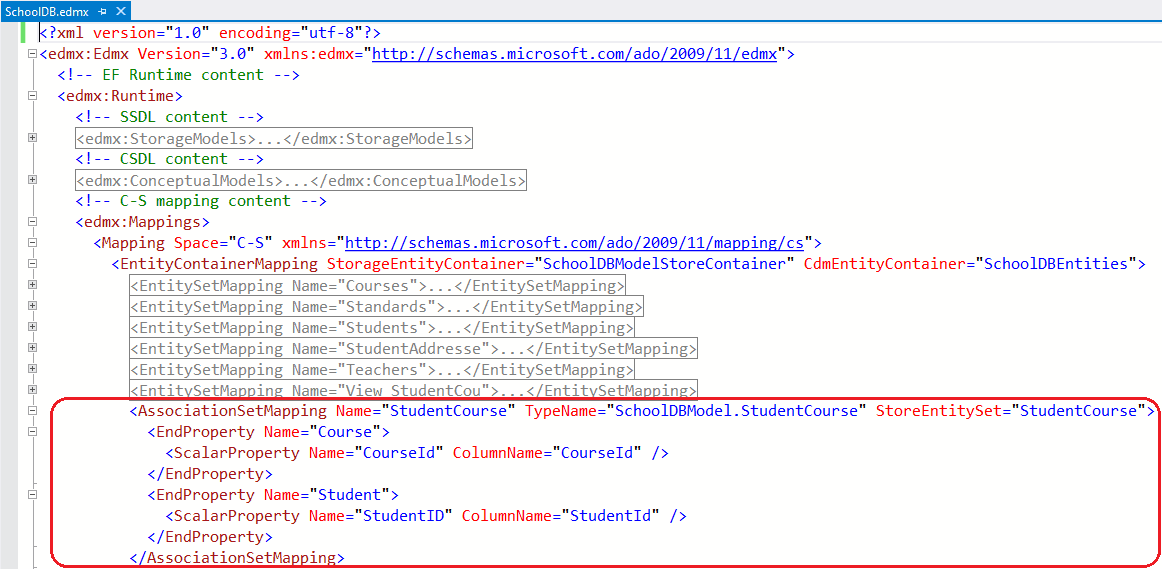
Open EDM in XML view. You can see that SSDL has StudentCourse entityset but CSDL doesn’t have StudentCourse entityset instead it’s being mapped in navigation property of Student and Course entity. In MSL (C-S Mapping), it has a mapping between Student and Course into StudentCourse table in <AssociationSetMapping/>

Thus Many-to-Many relationship is being managed in C-S mapping in EDM. So when you add student in course or Course in Student entity and when you save it then it will insert PK of added student and course in StudentCourse table. So this mapping not only enables a convenient association directly between the two entities, but also manages querying, inserts, and updates across this join.
But remember EDM does this only when joining table has PK columns for both tables. If you have some other columns in joining table then EDM will treat as normal entity and you have to use ‘Join’ in your query to fetch the data.
Add One-to-One Entities with ObjectContext:
Here, we will see how to save an entities which has One-to-One relationships.
There will not be any difference in connected or disconnected scenario code to add an entity graph as a new row. So we will see code example which will work in both the scenario.
Following code saves Student and StudentAddress entities as a new row in Student and StudentAddress table in the database which has One-to-One relationship:
            Student student = new Student();
            student.StudentName = "Student2";

            Standard std = new Standard();
            std.StandardName = "Standard2";

            student.Standard = std;

            StudentAddress sAddress = new StudentAddress();

            sAddress.Address1 = "Address1";
            sAddress.Address2 = "Address2";
            sAddress.City = "City1";
            sAddress.State = "State1";

            student.StudentAddress = sAddress;

            using (SchoolDBContext ctx = new SchoolDBContext())
            {

                ctx.Students.AddObject(student);
                ctx.SaveChanges();
            }
As you can see in above code, we just add student object to Students EntitySet and then call SaveChanges. This will automatically insert new row not only for Student but also for Standard and StudentAddress table in the database. Because Standard and StudentAddress is assigned to Student entity, context automatically detects it and insert it as a new row in respected table. We don’t have to add Standard and StudentAddress entities into its respected EntitySet. Thus you can add One-to-One entity graph easily.
Add One-to-Many Entities with ObjectContext:
Following code saves one Standard and multiple teachers for that Standard as a one new row in Standard table and three new rows in Teacher table in the database which has One-to-Many relation:
There will not be any difference in connected or disconnected scenario code to add an entity graph as a new row. So we will see code example which will work in both the scenario.
Following code saves Student and StudentAddress entities as a new row in Student and StudentAddress table in the database which has One-to-One relationship:
        Standard std = new Standard();

        std.StandardName = "Standard1";
        std.Description = "Demo standard";

        Teacher teacher1 = new Teacher();
        teacher1.TeacherName = "Teacher1";

        Teacher teacher2 = new Teacher();
        teacher2.TeacherName = "Teacher2";

        Teacher teacher3 = new Teacher();
        teacher3.TeacherName = "Teacher3";

        //Adding many teachers for one standard
        std.Teachers.Add(teacher1);
        std.Teachers.Add(teacher2);
        std.Teachers.Add(teacher3);

        using (SchoolDBContext ctx = new SchoolDBContext())
        {
            ctx.Standards.AddObject(std);
            ctx.SaveChanges();

        }
As you can see in above code, we have created new Standard entity and because Standard and Teacher entity has One-to-Many relationship, we have added three new teacher entities into Standard using std.Teachers.Add(..). Then we just add standard entity to Standards EntitySet and call SaveChanges. So this will insert new row in standard and three new rows in teacher table associated with added standard in the database. Thus you can save One-to-Many entity graph.
Update One-to-One Entities with ObjectContext:
Now let’s see how we can update an entity graph which intern updates the changes in the database in connected as well as disconnected scenario.
Connected Scenario:
Following code shows how we can save modified Student and StudentAddress entity graph to the database in connected scenario:
    using (var ctx = new SchoolDBContext())
    {
        Student student = (from s in ctx.Students
                           where s.StudentName == "Student1"
                           select s).FirstOrDefault<Student>();

        student.StudentName = "Updated Student1";

        StudentAddress sAddress = student.StudentAddress;

        sAddress.Address1 = "Updated Address1";
        sAddress.Address2 = "Updated Address2";
        sAddress.City = "Updated City";
        sAddress.State = "Updated State";

        student.StudentAddress = sAddress;

        ctx.SaveChanges();
    }
As you can see in above code that we fetch the student entity from database whose name is "Student1" and then we modified it’s StudentName and other StudentAddress’s properties. To update these changes in the database, we just call SaveChanges. So this will update all the modified properties to the respected tables in the database. So the only call to SaveChanges will update the database tables in connected scenario.
Disconnected Scenario:
Following code shows how we can update the Student and StudentAddress entity graph to the database in disconnected scenario:
    Student student = null;

    using (var ctx = new SchoolDBContext())
    {
        ctx.ContextOptions.LazyLoadingEnabled = false;

        student = (from s in ctx.Students.Include("StudentAddress")
                           where s.StudentName == "student2"
                           select s).FirstOrDefault<Student>();
    }

    student.StudentName = "Updated student2";

    //update student address
    student.StudentAddress.Address1 = "Updated Address1";
    student.StudentAddress.Address2 = "Updated Address2";
    student.StudentAddress.City = "Updated City";
    student.StudentAddress.State = "Updated State";

    using (var newCtx = new SchoolDBContext())
    {
        newCtx.Students.Attach(student);

        //Mark student entity as Modified EntitySet
        newCtx.ObjectStateManager.ChangeObjectState(student, System.Data.EntityState.Modified);

        //Mark studentAddress entity as Modified EntitySet
        newCtx.ObjectStateManager.ChangeObjectState(student.StudentAddress, System.Data.EntityState.Modified);

        newCtx.SaveChanges();
    }
As you can see in above code that we just modified properties of Student and StudentAddress entities in disconnected mode. When we used new context object to finally update the database, we first attached the student entity to Students EntitySet and then marked student and studentAddress entity as Modified using ObjectStateManager and then calling SaveChanges. These steps will update the Student and StudentAddress table in the database. so marking each entity in entity graph as modified is necessary to update the respected table in the database in disconnected scenario. In case, you don’t mark StudentAddress entity as modified then context will not update the StudentAddress table. So don’t forget to mark entities as modified in disconnected scenario.
Update One-to-Many Entities with ObjectContext:
Now we will see how we can update the entity graph which has One-to-Many relationship in connected and disconnected scenario.
Connected Scenario:
Following code shows how we can save modified Standard and Teachers entity graph which has One-to-Many relationship to the database in connected scenario:
        using (var ctx = new SchoolDBContext())
           {

            //fetching existing standard from the db
            Standard std = (from s in ctx.Standards
                            where s.StandardName == "standard3"
                            select s).FirstOrDefault<Standard>();

            std.StandardName = "Updated standard3";
            std.Description = "Updated standard";

            //getting first teacher to be removed
            Teacher tchr = std.Teachers.FirstOrDefault<Teacher>();

            //removing teachers (enable cascading delete for the teacher)
            if (tchr != null)
                ctx.Teachers.DeleteObject(tchr);


            Teacher stdTeacher = std.Teachers.FirstOrDefault<Teacher>();

            if (stdTeacher != null)
                stdTeacher.TeacherName = "Updated Teacher";

             Teacher newTeacher = new Teacher();
             newTeacher.TeacherName = "New Teacher";

            std.Teachers.Add(newTeacher);

            Teacher existingTeacher = (from t in ctx.Teachers
                                       where t.StandardId != std.StandardId
                                       select t).FirstOrDefault<Teacher>();

            if (existingTeacher != null)
                std.Teachers.Add(existingTeacher);

            ctx.SaveChanges();
        }
As you can see in above code that there is no difference in update mechanism of one-to-many entity graph in connected scenario. Just call to SaveChanges will update all respected tables for the entities.
Disconnected Scenario:
Saving entity graph which has one-to-many relationship in disconnected scenario is much complex process. We will see how we can save modified Standard and Teachers entity graph to the database in disconnected scenario which has One-to-Many relationship. Let’s do it step by step.
First, fetch the standard entity including its teachers. Following code fetch the Standard entity which has StandardName as "standard1" including teachers using “Include” method in LINQ-to-Entities from the database:
        Standard std = null;

        using (var ctx = new SchoolDBContext())
        {
            //fetching existing standard from the db
            std = (from s in ctx.Standards.Include("Teachers")
                   where s.StandardName == "standard1"
                   select s).FirstOrDefault<Standard>();
        }
Following code modifies properties of Standard entity. It also modifies the first teacher, deletes the second teacher and then adds new teacher in the Teachers collection of standard in disconnected scenario (out of context scope):
        std.StandardName = "Updated standard3";
        std.Description = "Updated standard description";

        if (std.Teachers  != null)
        {
            if (std.Teachers.Count >= 2)
            {
                //get the first element to be updated
                Teacher updateTchr = std.Teachers.ElementAt<Teacher>(0);

                //get the second element to be removed
                Teacher deletedTchr = std.Teachers.ElementAt<Teacher>(1);

                //remove updated teacher to re-add later
                std.Teachers.Remove(updateTchr);

                //delete second teacher from the list
                // deleted second teacher
                std.Teachers.Remove(deletedTchr);

                //Update first teacher in the list
                updateTchr.TeacherName = "Updated Teacher1";

                // re-add first teacher
                std.Teachers.Add(updateTchr);
            }
        }

        // adding new teacher for selected standard
        Teacher newTeacher = new Teacher();
        newTeacher.TeacherName = "NewTeacher";
        std.Teachers.Add(newTeacher);
Now, following code shows how we can update the standard entity graph using new context where some teachers are updated, some are deleted and some teachers are added in the Teachers collection for the standard entity:
        //Save standard and tearchers Updated above in different context just to create disconnected scenario
        using (var newCtx = new SchoolDBContext())
        {
            //fetch existing standard info
            var exitingStandard = (from s in newCtx.Standards
                                   where s.StandardId == std.StandardId
                                   select s).FirstOrDefault<Standard>();


            var newTeachers = std.Teachers.ToList<Teacher>();
            var existingTeachers = exitingStandard.Teachers.ToList<Teacher>();

            // find added teachers from newTeachers whose TeacherId doesn't match with Existing teachers
            var addedTeachers = newTeachers.Except(existingTeachers, tchr => tchr.TeacherId);

            // find deleted teachers from existing (from db) teachers whose TeacherId is not in newTeachers list
            var deletedTeachers = exitingStandard.Teachers.Except(newTeachers, tchr => tchr.TeacherId);

            //find Updated teachers from existing teachers which is either not deleted or Added
            var updatedTeachers = exitingStandard.Teachers.Except(deletedTeachers, tchr => tchr.TeacherId);

            //Add new teachers to context
            addedTeachers.ToList<Teacher>().ForEach(t => newCtx.Teachers.AddObject(t));

            //Attacher Updated teachers to context and mark it's state as Modified
            foreach (Teacher t in updatedTeachers)
            {
                newCtx.Teachers.Attach(t);
                newCtx.ObjectStateManager.ChangeObjectState(t, System.Data.EntityState.Modified);
            }

            // delete the deleted teachers in the context
            deletedTeachers.ToList<Teacher>().ForEach(t => newCtx.Teachers.DeleteObject(t));

            // save all above changes
            newCtx.SaveChanges();
        }
As you can see in above code that first we re-fetch existing standard from the database using new context object. Then we find the added teachers using “Except” method of teachers collection by matching teacherId of new collection of teachers and existing collection of teachers. E.g.var addedTeachers = newTeachers.Except(existingTeachers, tchr => tchr.TeacherId);
Above statement will return list of teachers whose TeacherId doesn’t match with existing teacher’s TeacherId. So here, all the new teachers whose TeacherId is zero will be returned because it hasn’t been generated yet.
So the same way we find the updated teachers and deleted teachers from the Teachers collection. Then we add, update or delete the respected teachers in new context and then call SaveChanges.
So thus we have to find added, updated and deleted entities from the collection and do CUD operation in disconnected scenario.
Update Many-to-Many Entities with ObjectContext:
Now let’s see how to save student and course entity graph which has Many-to-Many relation to the database.
Connected Scenario:
Following code saves modified Student and Courses (for that student) to the database:
        using (var ctx = new SchoolDBContext())
        {
            Student student = (from s in ctx.Students
                               where s.StudentName == "Student3"s
                               select s).FirstOrDefault<Student>();

            student.StudentName = "Updated Student3";

            Course cours = student.Courses.FirstOrDefault<Course>();

            //removing course from student
            student.Courses.Remove(cours);

            ctx.SaveChanges();
        }
As you can see in above code, we get the first course from Student's Course collection and then removing that course from the Student's courses collection using student.Courses.remove(cours) and then calling SaveChanges. We can also add new courses in the collection but we skip that part here. So this way just call to SaveChanges will save all your activity of Many-to-Many relation entities in connected scenario.
Disconnected Scenario:
Following code saves modified Student and Course(for that student) to the database in disconnected scenario:
        Student student = null;

        using (var ctx = new SchoolDBContext())
        {
            //Disable LazyLoading in disconnected scenario
            ctx.ContextOptions.LazyLoadingEnabled = false;

            student = (from s in ctx.Students.Include("Courses")
                               where s.StudentName == "student3"
                               select s).FirstOrDefault<Student>();
        }

        student.StudentName = "Updated student3";


        Course cours = student.Courses.FirstOrDefault<Course>();
        //removing first course from student's existing courses
        student.Courses.Remove(cours);

        using (var newCtx = new SchoolDBContext())
        {
            newCtx.ContextOptions.LazyLoadingEnabled = false;

            //fetch existing student
            var dbStudent = (from s in newCtx.Students.Include("Courses")
                                   where s.StudentID == student.StudentID
                                   select s).FirstOrDefault<Student>();

            var newCourses = student.Courses.ToList<Course>();
            var dbCourses = dbStudent.Courses.ToList<Course>();

            //You may skip this if you update only courses of the student but not student itself.
            newCtx.ApplyCurrentValues<Student>("Students", student);

            //new course or exiting courses added to student's courses
            var addedCourses = newCourses.Except(dbCourses, cs => cs.CourseId).ToList<Course>();

            var deletedCourses = dbCourses.Except(newCourses, cs => cs.CourseId).ToList<Course>();

            addedCourses.ForEach(cs => dbStudent.Courses.Add(cs));
            deletedCourses.ForEach(cs => dbStudent.Courses.Remove(cs));

            newCtx.SaveChanges();
        }
As you can see in above code, we do the same thing as we did it to update One-to-Many entity graph in disconnected scenario. First we re-fetch existing student from the database using new context object. Then we find the added courses using “Except” method of collection by matching CourseId of new Course collection and existing course collection.
E.g. var addedCourses = newCourses.Except(dbCourses, cs => cs.CourseId).ToList<Course>();
E.g. var addedCourses = newCourses.Except(dbCourses, cs => cs.CourseId).ToList<Course>();
Above statement will return list of course whose CourseId doesn’t match with existing CourseId. So here, all the new courses whose CourseId is zero and the existing course which is currently not assigned to student will be returned. Here we have to consider two types of added courses. Course which is new and the Course which is not new means already in the database but not assigned to the student. So be careful of this.
So the same way we find the updated courses and deleted courses from the collection. Then we add, update or delete the respected courses in new context and then call SaveChanges.
So thus we have to find added, updated and deleted Many-to-Many entities from the collection and do CUD operation in disconnected scenario.
Delete One-to-One Entities with ObjectContext:
Here, we will see how to delete an StudentAddress entity which has One-to-One relation with Student entity in connected and disconnected scenario.
Connected Scenario:
Following code deletes the student’s address from StudentAddress table in the database:
        using (var ctx = new SchoolDBContext())
        {
            Student student = (from s in ctx.Students
                               where s.StudentName == "Student1"
                               select s).FirstOrDefault<Student>();

            StudentAddress sAddress = student.StudentAddress;

            ctx.StudentAddresses.DeleteObject(sAddress);

            ctx.SaveChanges();
        }
As you can see in above code that we just delete the StudentAddress entity from StudentAddress entityset and then calling SaveChanges.
Disconnected Scenario:
Following code deletes the student’s address from StudentAddress table in the database in disconnected scenario:
        Student student = null;
        using (var ctx = new SchoolDBContext())
        {
            student = (from s in ctx.Students.Include("StudentAddress")
                       where s.StudentName == "Updated POCOProxyInDisconnectedScenario student2"
                               select s).FirstOrDefault<Student>();
        }

        // Delete StudentAddress entity using different context
        using (var newCtx = new SchoolDBContext())
        {
            newCtx.StudentAddresses.Attach(student.StudentAddress);
            newCtx.StudentAddresses.DeleteObject(student.StudentAddress);

            newCtx.SaveChanges();
        }
As you can see in above code, we first attach StudentAddress in the StudentAddress entityset of new context and then we use DeleteObject method of StudentAddress entityset which deletes it from the entityset of new context. And finally call to SaveChanges will send the delete query to the database which actually deletes the address from the StudentAddress table.
Delete One-to-Many Entities with ObjectContext:
Connected Scenario:
Following code deletes the teacher for standard which has One-to-Many relationship from the database in connected scenario:
        using (var ctx = new SchoolDBContext())
        {
            //fetching existing standard from the db
            Standard std = (from s in ctx.Standards
                            where s.StandardName == "standard3"
                            select s).FirstOrDefault<Standard>();

            //getting first teacher to be removed
            Teacher tchr = std.Teachers.FirstOrDefault<Teacher>();
            //removing teachers
            if (tchr != null)
                ctx.Teachers.DeleteObject(tchr);

            //Do not use std.Teachers.Remove(tchr). It will give exception.
            //This statement doesn't remove teacher from teachers collection but it trying to
            //remove relationship.
            //std.Teachers.Remove(tchr);

            ctx.SaveChanges();
        }
As you can see in above code, we remove the teacher by ctx.Teachers.DeleteObjct(teacher). This will delete the teacher from the database table. Do not use std.Teacher.Remove(teacher) because this statement will try to delete the standard and teacher relationship. So be careful while deleting.
Disconnected Scenario:
Following code deletes the teacher for standard (which has One-to-Many relationship) from the database in disconnected scenario:
        Standard std = null;

        using (var ctx = new SchoolDBContext())
        {
            ctx.ContextOptions.LazyLoadingEnabled = false;

            //fetching existing standard from the db
            std = (from s in ctx.Standards.Include("Teachers")
                   where s.StandardName == "standard3"
                            select s).FirstOrDefault<Standard>();
        }
        //Creating new context
        using (var newCtx = new SchoolDBContext())
        {
            //getting first teacher to be removed
            Teacher tchr = std.Teachers.FirstOrDefault<Teacher>();

            newCtx.Teachers.Attach(tchr);
            //removing teachers
            newCtx.Teachers.DeleteObject(tchr);

            //Do not use std.Teachers.Remove(tchr). It will give exception.
            //This statement doesn't remove teacher from teachers collection
            //but it trying to remove relationship.
            //std.Teachers.Remove(tchr);

            newCtx.SaveChanges();
        }
As you can see in above code, we first attach the teacher entity in Teachers entityset in new context object. Then we delete it from the collection. Thus you can delete the One-to-Many entity graph in disconnected scenario.
Delete Many-to-Many Entities with ObjectContext:
Connected Scenario:
Following code deletes the course from student's courses in connected scenario. This will delete row in StudentCourse table but not delete the actual course from Course table in the database:
        using (var ctx = new SchoolDBContext())
        {
            Student student = (from s in ctx.Students
                               where s.StudentName == "Student3"
                               select s).FirstOrDefault<Student>();

            Course cours = student.Courses.FirstOrDefault<Course>();

            //removing course from student
            student.Courses.Remove(cours);

            ctx.SaveChanges();
        }
As you can see in above code, we do student.Courses.Remove(cours) because student and courses has Many-to-Many relation. So thus you can delete Many-to-Many entity graph in connected scenario.
Disconnected Scenario:
Following code deletes the course from student’s courses in disconnected scenario:
        Student student = null;

        using (var ctx = new SchoolDBContext())
        {
            ctx.ContextOptions.LazyLoadingEnabled = false;

            student = (from s in ctx.Students.Include("Courses")
                       where s.StudentName == "student3"
                               select s).FirstOrDefault<Student>();

        }

        Course cours = student.Courses.FirstOrDefault<Course>();

        //removing course from student
        student.Courses.Remove(cours);

        using (var newCtx = new SchoolDBContext())
        {
           var dbStudent = (from s in newCtx.Students.Include("Courses")
                       where s.StudentID == student.StudentID
                       select s).FirstOrDefault<Student>();

           var deletedCourses = dbStudent.Courses.Except(student.Courses, cs => cs.CourseId).ToList<Course>();

           deletedCourses.ForEach(cs => dbStudent.Courses.Remove(cs));

            newCtx.SaveChanges();
        }
As you can see in above code, we re-fetch the student from the database and then finding deleted courses whose CourseId doesn’t match with new course collection using dbStudent.Course.Except() method. Then we remove it from courses collection of student. Make sure that LazyLoading is disabled otherwise it will give exception.
Thus you can delete Manny-to-Many entity graph from the database.
Stored Procedure in Entity Framework:
Entity Framework has ability to automatically build native commands for database based on your LINQ to Entities or Entity SQL queries, as well as build the commands for inserting, updating, or deleting data, you may want to override these steps and use your own predefined stored procedures. You can use stored procedures mainly for either to get the data or add/update/delete the records to one or multiple database tables.
Stored procedures and user-defined functions (UDFs) in the database are represented as functions in entity framework. So you won’t have any entity or other stuff for stored procedures in the EDM designer. But you have to perform some extra steps to make stored procedures work in the entity framework which we will see soon.
One important point to remember is that the EDM designer doesn’t allow you to write stored procedures and bring them into the database. That means it doesn’t matter whether you opt for the code-first, model-first or database-first approach. You always have to create your stored procedures in the database and later import them into the EDM
In the next chapter, we will see how to work with Stored Procedures for CRUD operation using Entity Framework 4.1.
Data read using Stored Procedure:
Here, we will use stored procedure to get the Courses by Student. So we will create following "GetCoursesByStudentId" stored procedure:
        CREATE PROCEDURE [dbo].[GetCoursesByStudentId]
        -- Add the parameters for the stored procedure here
        @StudentId int = null
        AS
        BEGIN
            -- SET NOCOUNT ON added to prevent extra result sets from
            -- interfering with SELECT statements.
            SET NOCOUNT ON;

            -- Insert statements for procedure here
        select c.courseid, c.coursename,c.Location
        from student s left outer join studentcourse sc
        on sc.studentid = s.studentid left outer join course c on c.courseid = sc.courseid
        where s.studentid = @StudentId
        END
Now, you have to perform two steps to use this stored procedure in entity framework.
- Add the stored procedure in EDM
- Add function import.
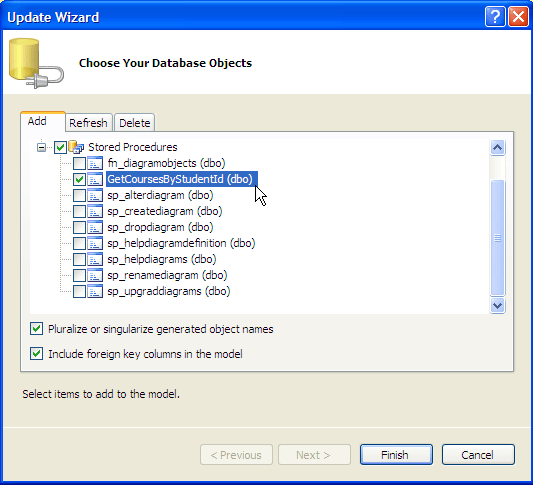
Add stored procedure in EDM: As we added tables in the EDM, the same way you can add stored procedures in the EDM. If you want to add it in existing EDM the right click on designer and click on "Update model from database..". This will popup update wizard where you can select stored procedures and add it.

When you click on "Finish", you won't find any changes in the designer that's because stored procedure is not being treated as entity. This step will only add stored procedure in storage model. You can see it in XML view of the designer.

Wait a minute.. still you cannot use this stored procedure because Entity Framework doesn't allow a stored procedure to be queried until it's mapped in the EDM. So now we have to map this stored procedure to the conceptual model. To do that we have to perform second step, "Add function import".
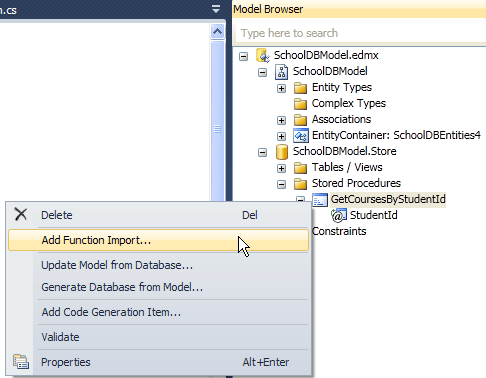
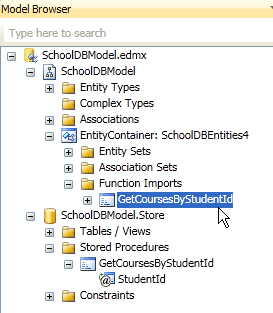
Add function import: Now in this step, we will import a function for the stored procedure. To do that, right click on the designer surface and select "Model Browser". Here you can see your stored procedure by expanding "Stored Procedures" node of SchoolDBModel.Store. Now, right click on your stored procedure and select "Add function import..".

This will popup "Add Function Import":
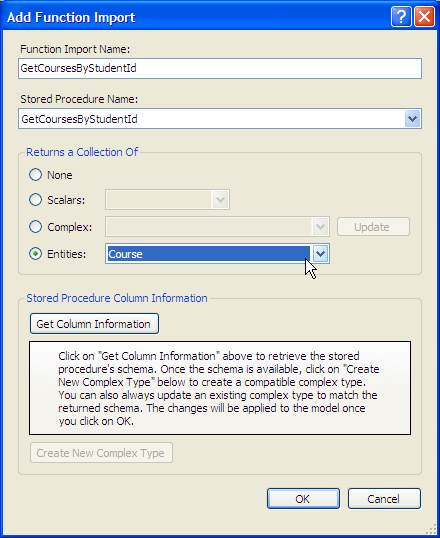
Here, you can select four types of return values: None, Scalars, Complex and Entities. Let's see each of these:
None: it means stored procedure will not return any value.
Scalars: it means stored procedure will return single value of selected type like binary, Boolean, byte etc.
Complex: It means stored procedure will return complex type which is only on conceptual model but not in database table. You can create complex type here only by first clicking on ‘Get Column Information’ which will get the schema of stored procedure and then click on ‘Create New Complex Type’ which will generate complex type.
Entities: it means stored procedure will return collection of selected entities.
In our case, stored procedure will return collection of Course entity. Click ‘OK’. This will update your conceptual model and bring stored procedure in conceptual model under function import.
Now you can query this stored procedure in entity framework using context as following:
    using (var ctx = new SchoolDBEntities())
    {
        IList<Course> courseList = ctx.GetCoursesByStudentId(1).ToList<Course>();
        //do something with courselist here
    }
Make sure that stored procedure returns the same columns as you have in course entity otherwise it will give you exception. If you use POCO entities then regenerate context from T4 template to include function import in the context.
So this way you can do read operation with stored procedure in entity framework.
Add/Update data using Stored Procedure:
If you have existing stored procedures to Insert, Update and Delete the record in the database table then you can use those stored procedures for CUD operation instead of entity framework's default saving mechanism using EntitySet. So let's see how we can use stored procedure to insert, update and delete the student records in the database.
First, you have to write stored procedure for Insert, Update and Delete for student. Following is a "sp_InsertStudentInfo" stored procedure which inserts the row in student table.
    CREATE PROCEDURE [dbo].[sp_InsertStudentInfo]
    -- Add the parameters for the stored procedure here
    @StandardId int = null,
    @StudentName varchar
    AS
    BEGIN
    -- SET NOCOUNT ON added to prevent extra result sets from
    -- interfering with SELECT statements.
    SET NOCOUNT ON;

     INSERT INTO [SchoolDB].[dbo].[Student]
           ([StudentName]
           ,[StandardId])
     VALUES
           (
           @StudentName,
    @StandardId
    )
    SELECT SCOPE_IDENTITY() AS StudentId
Similar way you can write update and delete procedure.
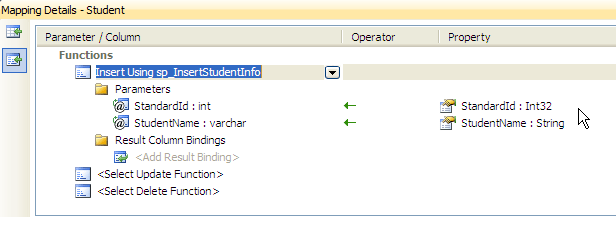
Now you have to add this stored procedure to EDM. After adding stored procedure, click on Student entity on designer and select "Stored Procedure Mapping". Here you can select our created stored procedure "sp_InsertStudentInfo" as insert function. The same way you can select other stored procedure for update and delete function as well:

Once you select the stored procedure, it will automatically assign the parameters for it as below.

So now context will use mapped stored procedure for adding, updating and deleting the student entity.
Following code will use "sp_InsertStudentInfo" stored procedure for insert operation:
   using (var ctx = new SchoolDBEntities())
            {
                Student stud = new Student();
                stud.StudentName = "New sp student";
                stud.StandardId = 262;

                ctx.Students.AddObject(stud);
                ctx.SaveChanges();
            }
DefiningQuery in Entity Framework:
A defining query allows you to execute a native SQL statement that is specified in the DefiningQuery element in the EntitySet element in the SSDL.
A defining query is commonly used to provide functionality similar to that provided by a database view, but this native SQL statement will be in the .edmx file, not in the database. The entityset in CSDL is used to surface data exposed by the defining query.
So here, we will see how we can execute same SQL using DifiningQuery which we used in database view in previous chapter and get the same functionality as database view.
We will perform following three steps to create and use DefiningQuery:
- Add DefiningQuery in SSDL
- Add EntitySet in CSDL
- Mapping between Conceptual and Storage EntitySets
Add DefiningQuery in SSDL: First of all, we have to add DefiningQuery in SSDL part of .edmx file.
Here we will use following SQL query:
      SELECT     dbo.Student.StudentID, dbo.Student.StudentName, dbo.Course.CourseId,
      dbo.Course.CourseName FROM dbo.Student INNER JOIN
      dbo.StudentCourse ON dbo.Student.StudentID = dbo.StudentCourse.StudentId INNER JOIN
      dbo.Course ON dbo.StudentCourse.CourseId = dbo.Course.CourseId
So now open .edmx file in XML editor and EntitySet in SSDL (first part in XML view) as following:
    <EntitySet Name="StudentCourseView" EntityType="SchoolDBModel.Store.StudentCourseView" store:Type="Views" store:Schema="dbo" store:Name="StudentCourseView">
        <DefiningQuery>
          SELECT     dbo.Student.StudentID, dbo.Student.StudentName, dbo.Course.CourseId, dbo.Course.CourseName
          FROM         dbo.Student INNER JOIN
          dbo.StudentCourse ON dbo.Student.StudentID = dbo.StudentCourse.StudentId INNER JOIN
          dbo.Course ON dbo.StudentCourse.CourseId = dbo.Course.CourseId
        </DefiningQuery>
      </EntitySet>
Now we have to add EntityType in same SSDL as we mention in EntityType attribute of EntitySet above.
      <EntityType Name="StudentCourseView">
        <Key>
        <PropertyRef Name="StudentId" />
        <PropertyRef Name="CourseId" />
        </Key>
        <Property Name="StudentId" Type="int" Nullable="false" StoreGeneratedPattern="Identity" />
        <Property Name="CourseId" Type="int" Nullable="false" StoreGeneratedPattern="Identity" />
        <Property Name="StudentName" Type="varchar" MaxLength="50" />
        <Property Name="CourseName" Type="varchar" MaxLength="50" />
      </EntityType>
So this way you have added DefiningQuery in SSDL. Now we will add EntitySet in CSDL which will collect the data returned by DefiningQuery.
Add EntitySet in CSDL:
We can add EntitySet in CSDL from the designer itself. To add EntitySet in CSDL, right click on designer surface and click Add ->Entity.. this will open Add Entity popup.
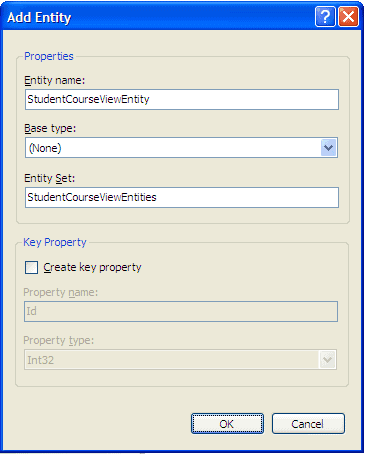
Enter Entity name as StudentCourseViewEntiy. Uncheck Create key property and click ‘OK’. This will put StudentCourseViewEntity in designer.
Now add following scalar properties by right clicking on StudentCourseViewEntity in designer and add scalar property:
StudentId - Int32 – NotNull
CourseId – Int32 – NotNull
StudentName – String – NotNull
CourseName – String – NotNull
Mark StudentId and CourseId property as EntityKey = true from property window. So this way you can add EntitySet in CSDL from designer. Now we will map both the EntitySet.
Mapping between Conceptual and Storage EntitySets:
To map Conceptual and Storage EntitySets from the designer, right click on ‘StudentCourseViewEntity’ entity on designer and select ‘Table Mapping’. In the Table Mapping, select ‘StudentCourseView’ which contains DefiningQuery in SSDL. This will automatically map properties of both EntitySet based on name and type as below:

So this way you can use DefiningQuery to write any native-SQL query for the database.
Now you can use DefiningQuery using context as following:
    using (var ctx = new SchoolDBEntities())
        {
            IList<StudentCourseViewEntity> studentCourseList = (from sc in ctx.StudentCourseViewEntities
                     where sc.StudentId == 226
                     select sc).ToList<StudentCourseViewEntity>();
        }
Data binding with ASP.Net application:
Now let’s see how we can bind Student entity graph to GridView in ASP.Net.
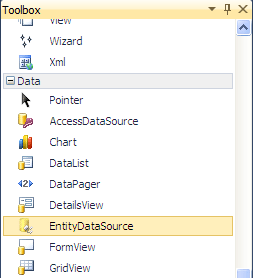
First of all , create the ASP.Net web application project. Now drag & drop GridView and EntityDataSource from Data part in Default.aspx:

Now before you configure EntityDataSource, you have to add connection string in web.config. I have following connection string in web.config:
<add name="SchoolDBEntities" connectionString="metadata=res://*/DBModel.SchoolDBModel.csdl|res://*/DBModel.SchoolDBModel.ssdl|res://*/DBModel.SchoolDBModel.msl;provider=System.Data.SqlClient;provider
connection string="Data Source=.;Initial Catalog=SchoolDB;Integrated Security=True;MultipleActiveResultSets=True""
providerName="System.Data.EntityClient" />
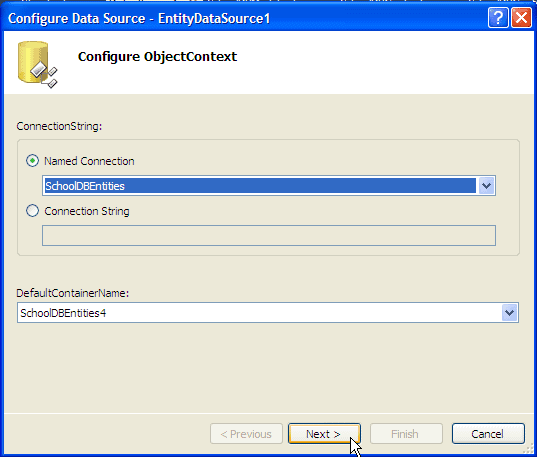
Now go to design view of Default.aspx and click on configure EntityDataSource.
Select Named Connection from dropdown. This dropdown shows name of connection string in your web.config. We have "SchoolDBEntities”"as connection string name so dropdown will have it.

Select DefaultContainerName also and click "Next":
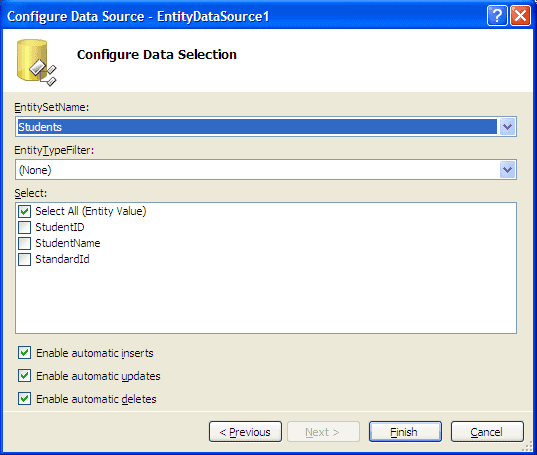
Here, select "Students" EntitySet because we are going to display Student information in the GridView. Click "Finish".
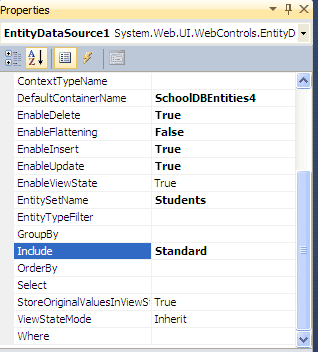
Now we want to display Standard name instead of StandardId. So we have to get the Standard entity which is navigation property in the Student EntitySet. So for that, select EntityDataSource and press F4 to open property window. Here you set Include property value to "Standard":

Now to configure GridView, click on "Configure GridView and choose "EntityDataSource1" as data source. This will automatically display columns for Students with StandardID. Now to display StandardName instead of StandardId, remove the StandardId column and write following code in TemplateField of GridView:
    <asp:TemplateField HeaderText="Standard Name" SortExpression="StandardName">
        <EditItemTemplate>
            <asp:Label ID="Label1" runat="server" Text='<%# Eval("Standard.StandardName") %>'>
            </asp:Label>
        </EditItemTemplate>
        <ItemTemplate>
            <asp:Label ID="Label2" runat="server" Text='<%# Bind("Standard.StandardName") %>'>
            </asp:Label>
        </ItemTemplate>
    </asp:TemplateField>
Now you are done. Run the project and you will get following display:

Subscribe to:
Comments (Atom)


